Showing posts with label upcycle. Show all posts

Sunday 6 March 2016

Suede love and saying hi

It's been a while!  I've been sticking my head in the books and also stitching away for a fabulous wedding.  Here are the 3 bridesmaids in the dresses I made.


It was really a most beautiful day and the bride looked stunning.

So now I have submitted a few assignments I have returned to the sewing machine for a days chilled out sewing.

Recently I got given some suede scraps to use - for me scraps are teeny tiny bits of fabric that it is hard to decide what to make with.  I guess when you start doing upholstery scraps take on a different meaning because at the end of the suede session I have 3 cushion covers and a new skirt!

It was a totally new experience for me sewing with suede - something I have never tried but I really enjoyed it.  Yes it is not very forgiving - sew in the wrong place and the fabric lives to tell the tale but if you take it slow and steady it is fabulous!

I decided to make a wrap skirt done up with a button - when using a new fabric I thought I wouldn't try to tackle the zip!  I didn't have a pattern so just free-handed some shapes and lay them together until I was happy.

If you want to give suede a try I would suggest getting leather needles as using them made a huge difference to the sewing experience.  Other than it is much the same as usual just take it slow and steady!

So here it is ;


It is just an all round fun skirt - good to dress up and good to dress down.

I made the top too but more on that on another post!

Hope you're all having fun sewing

 :) 

Friday 29 May 2015

Upcycled Jeans

I am a great lover of charity shops but every now and then the bargain price tag and time constraints add together to equal hasty decisions.  I bought a pair of jeans over a year ago in a charity shop for about £3.  I jumped at them because they were flares and I can't resist a good pair of flairs.  Only problem was they were a bit short and when I washed them they got a bit shorter! So after a year of never wearing them I finally decided that skinny jeans don't have to be floor length so a bit of a conversion was in order.

So this is where I started - a fab pair of jeans but way too short for me!
 I turned them inside out and unpicked the hems of each leg.  This is really important as skipping this step leaves an untidy finish.
Once I did that I marked out where I wanted the trouser leg to be.  At this point I measured so that I took the same amount of fabric off on the inside leg of both legs and then again the outside leg of both legs.


And then comes the moment of being incredibly grateful for my overlocker.  On jobs like this it makes things so simple and so much more professional but in half the time.  If you don't have an overlocker you will need to use an overlock stitch on your machine.  A french seam is not going to work on heavy denim and certainly not for skinny jeans.
At this point I tried them on and made a couple of adjustments.  
 Then re-fold the hems back up exactly as they were.  The denim here held the creases perfectly so not measuring required I just followed the lines that were already drawn out for me,  Then I sealed off the overlocked stitch at the top of each seam.
And there you have it a new pair of jeans that I can actually wear!  Perfect with some ballet pumps . . 


 or a chunky pair of Doc Martens.

 As much as I hate to let a good pair of flares go I know that there are plenty more charity shop treasures to be had and these trousers will get much more use.
 I love a good upcycle :) 


Monday 13 April 2015

Weekender bag from a duvet cover!

I was recently lent a pattern to make a weekender bag.  Now I have a sewing machine that works I am finding my enthusiasm for trying more challenging projects is growing.  So I sat down a few weeks ago to begin the challenge.

I decided to use the same striped fabric that I had used for my cushions earlier in the month - basically because I just loved it so much!  The whole bag is quilted including the straps which made it a lot more time consuming than I had originally anticipated.  But I got my walking foot set up on the machine and after a bit of you tubing to understand how a walking foot actually works I set off on the quilting.

I am super impressed with how much easier it is to do quilting with the correct set up on the machine.  I was sewing fabric, wadding and another layer of fabric and it was pleasingly obedient.  After a good block of time quilting I was able to start on the construction.  I over locked everything using the stitches on the machine rather than my over locker (just to try them out :) ) and then was able to use straight stitches to join the pieces together.  The actual construction of the bag was pretty straight forward.  Lots of straight lines and the instructions I had borrowed as well as being able to see what someone else had made led to a pretty straight forward sewing job.

And here it is - stripey and proud.  I love the way the handles go right underneath the bag making it super secure.

Saturday 14 February 2015

Kimono Top

I am continuing to love the crochet but this weekend had a bit of free time and was given some patterns.  I had a good look through and saw a kimono style top.

I have always stuck to quite plain tops leaning towards brighter patterns in skirts.  Recently though I am travelling around mainly via scooter so find myself in jeans.  This has left me feeling a bit dull in the clothes that I wear.  Jeans and plain-ish tops are the style for me at the minute so a cute kimono top might just brighten things up a little bit.

I had some bright peachy-orange fabric that was the under side from a reclaimed duvet cover I was gifted.  The top side was used to make this funky dress.
Now the underside is being used to make a jacket.  It actually excites me when I find a way to use up some fabric that otherwise might have gone to waste.  Plus when I make something out of the fabric I already own without buying anything I get an extra buzz!

Tuesday 10 February 2015

Getting my crochet on!

So I kinda fell into this one - hanging out at the sewing cafe I try to get to when I can a friend of mine re-taught me to crochet.  My Mum and You-Tube have taught me on a few occasions however I never seemed to quite get going.
 I think this time round the cold weather and desire for a calm and peaceful pastime spurred me on.  I set off and practiced a few stitches eventually resulting in me simply stitching round and round in circles.

This didn't exactly turn into anything but it got me going and got me used to how I manage the tension - little fingers are key for this one for me!


Then I found this super simple tutorial on you-tube.  Simple and slow really is exactly what was required for me at this stage I'm afraid. If you fancy a go this is the link I used Crochet Blanket

Tuesday 27 May 2014

Upcycling my things!


This week I look around at my sewing room and realized that although I think I am pretty good at taking old things and making them new I am not always good at taking my old things and making them new.  I have so much fabric that is cut too small to turn into a bag or purse.  I have scraps or fabric with tears or stains literally everywhere.  They are beautiful pieces of fabric but need to find a way to be used.
 Following on from my patchwork bag which I continue to be in love with I have been feeling the patchwork vibe! I spent a lovely afternoon after work last week chatting to a friend and cutting up fabric scraps into more usable scraps.
 I have now set about attaching them altogether to create a patchwork something!  Given how many scraps I need to work through I think it will probably result in being a quilt but currently I am keeping an open mind.
 So far my patchwork has been using new fabrics - patches that have been bought for me by friends.  But patchwork was originally about making do and mending!  Taking the odds and ends of old clothes, old bedding, leftover fabrics - anything really - and turning them into something useful and hopefully beautiful too!
 I intend to get going on that style of sewing for a while - so this is going to be my first piece of patchwork that truly uses odds and ends of fabric.  I'm pretty excited to see how it turns out!  It will definitely be something I pick up and put down so don't expect a finished product any time soon!
 As much as I love the other patchwork I have done that followed a pattern and theme I am starting to love the absolute randomness of it.  It feels somehow more authentic!  We will see how it looks on a bigger scale!

Thursday 1 May 2014

Mens Shirt to Cute Skirt

My husband just gave me a pile of shirts that have become surplus to his requirements because they are looking too old - usually round the collar or sleeves or have been stained somehow.  They are a perfect upcycling resource so I thought I would do a tutorial on how I took an old shirt and turned it into a cute and 100% usable skirt!


SO here goes...

You will need
Scissors
A mans shirt
thread to match
I used a sewing machine but you could do it with a needle and thread
Pins
Tape Measure

1. I started off by measuring how long I wanted the skirt to be - I worked from my hips as I knew I was going to do a wide waist band.  Then I marked this line onto the shirt and cut along this line


2.Next I took the bottom piece of the skirt and sewed about 1cm away from the top edge all the way round from button to button hole.  This stitch is going to be gathered so if you are using a machine set it to the longest stitch length that you can and leave about 10cm thread on each end. 


3. Now take the bottom thread and gently pull - the fabric should start to gather and you can start to tease the gathers through the fabric until it matches your waist measurement.  It already looks quite cute right!


4. Now I need a waist band.  I wanted a nice line running down the skirt of the buttons so decided to use the front of the shirt as the waist band.  I cut out the front along all the seams therefore cutting the collar and sleeves off and then repeated for the back.

5. I then folded the fabric in half to create a neat top of the skirt.  I did this so that the two button holes matched exactly on each half.  I then removed the spare buttons and folded each fabric to match the first one.  I then trimmed the excess off to leave a neat rectangle.


6. I measured my waist and pinned the pieces of the waist band together at the sides.  This needs to be done right sides together.  If you have a mannequin use this to help you out. Simply pin it onto the mannequin to get the right size and then take it off and pin right sides together while the fabric is flat.  Sew along that line.


7. Now lay the waist band flat inside the skirt.  Put the right side of the waist band facing the inner side of the skirt and pin all along.  You must make sure that you line up the buttons at this point and this is also a great time to even up your gathers.  Sew just below your line of gathering stitch.

8. Now remove the pins and bring the waist band up.  Re-fold it over so that your button holes match exactly and then fold the raw edge upwards so that you have a neat fold over the top of your raw gathered edge.  At this point if you try it on your mannequin or you then you will see that having such a large waist band means it needs to come in again.  Take the centre back point and then fold in from each side of that point as if creating a pleat.  Pin.

9. Now sew all along your fold at the bottom of your waist band - be super straight as this is a top stitch that will show!  Then return to the pleat and sew the top of this.  It should look like this.


10.  Now trim your loose edges and there you have it a cute skirt - plus even though it has loads of buttons all you have had to do is straight line stitching - no button holes and no hand sewing on of buttons!  


I hope you have fun making yours - as always send me a picture and I'll give it a share!
x

Friday 28 February 2014

Tablecloth skirt

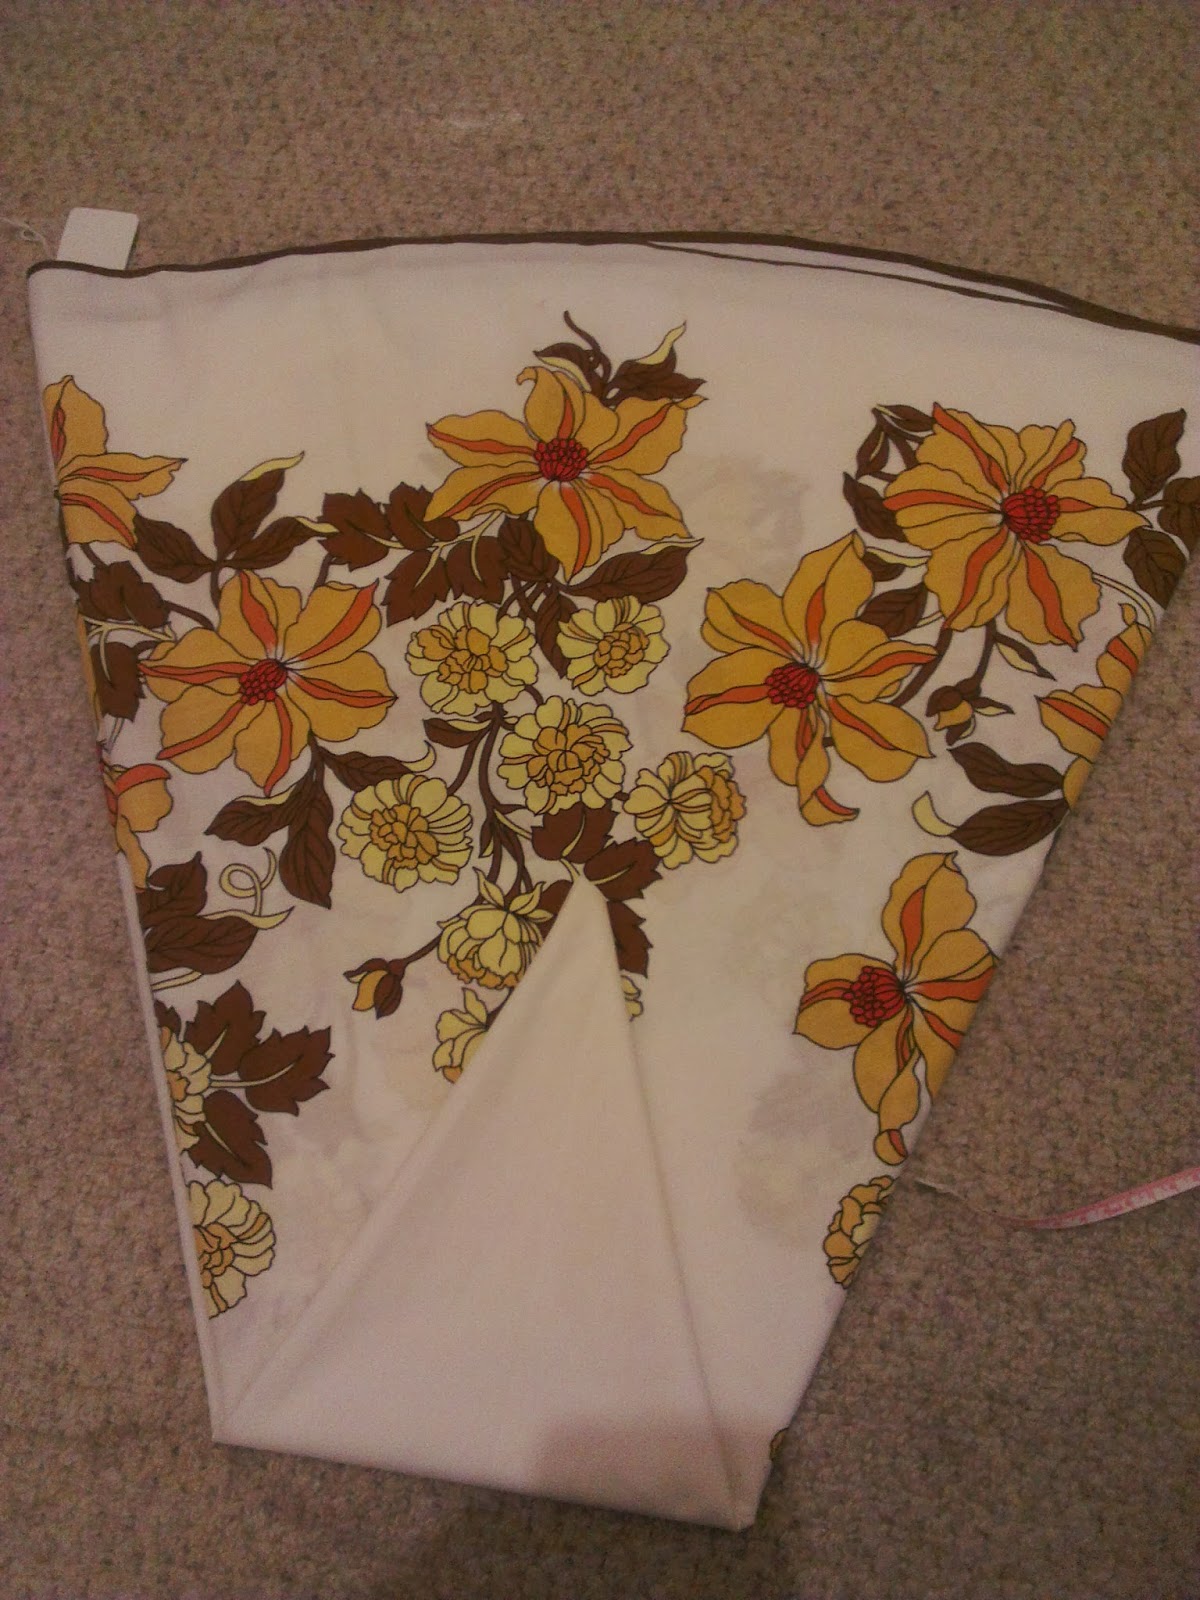
I bought this table cloth from a charity shop a week or so ago for £3.50.  More than perhaps I would like to spend on a tablecloth 2nd hand but I couldn't leave it behind!  I love those yellow flowers too much!  I knew immediately what I would be doing with it so as soon as I had a spare evening I got going!


 To start I folded the circular cloth into half and repeated until it was folded in 8ths.  I measured how long I would like the skirt to be and then cut the point off so the cloth equaled to this length allowing 1.5cm seam allowance.  This cloth was already edged at what will become the bottom of the skirt so no extra seam allowance needed here!

Now I have a large circular piece with a whole in the middle.  I cut where I wanted the back seam to be and then measured the length of the fabric.  It was 80cm and I needed to half it.


I set about pinning my gathers.  I used 8cm per gather and folded it so that the 8cm became 4cm therefore by the time I had finished my skirt is half the length of when I started.  I used the same gathering as I did here so click on the link to get the full tutorial.  Once you have pinned your pleats run a line of straight stitching to hold them in place and press firmly.

 I then overlocked the raw edges which can be done with a zig zag stitch if you don't have an overlocker and ran a straight stitch down the back seam to join the skirt.  Laying the zip onto the seam I stitched that in and then opened the seam with an unpicker where the zip will do up.
 Now I added a bias binding waist band.  This can be made as thick or thin as you like - I really liked the little band on this skirt so I went for it.
 And here you have it the finished skirt.
 And the skirt on me . . .
 And with a little shake of the hips you see the full swing-y-ness of this skirt and the reason why I was so happy to find such a lovely circular fabric.  This is a skirt to go dancing in!  Today it shall simply accompany me to a lunch date with a friend but one day I shall take it for a proper spin!

I'm pretty happy with the result - 1.5hours work(if you can call it that as for me sewing is an absolute pleasure) and £3.50 later I have a fab new skirt - plus I can say - Yes I did make that :)
Have a great weekend!
x

Saturday 22 February 2014

Some fabulous Upcycling


I thought I would take some time to do a bit of a post about some of the fabulous upcyclers that I come across.  I keep finding the most amazing creations made from old or unused things so thought I would do a post to shout out to some of these fantastic artists. So here goes . . .

A gorgeous upcycle of a toddlers tunic made from an old top!  This is by xoxo grandma - just click on the link to pop across to a whole load of sewing fabulousness! I love the gathering on this and the belt is too cute!

A sweater from a charity shop to a gorgeous bag - the detail on this is fantastic!  Pop over to visit Gina at Gina's craft corner

Here is a bright funky skirt made from old jeans and trousers!  I think both will get loads more use now!  This is from angel joy - hippy chick a blog filled with a whole variety of thoughts and ideas!


A fab accessory to any outfit here!  Pop across to this link from Vicky over at her blog - lots of fun ideas to see!

A bit of a smarter upcycle here and executed so very well!  A bridesmaids dress into a cute skirt that can be dressed up or down!  Perfect from ChiChi - pop over and explore!

And in the tone of my last blog post here is another tutorial on how to upcycle t-shirts in pants!  These ones are for your little ones but it's adaptable to any size!  I love those teddy bears!  This is from Irene over at Serger Pepper - a fantastic seamstress with loads of ideas and trouble shooting thoughts!


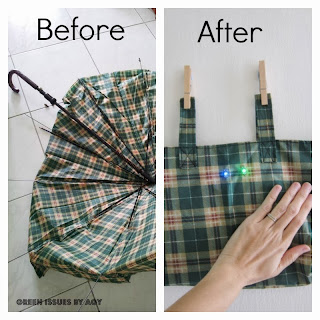
And here is the most surprising upcycle that never would have occurred to me but totally works.  An umbrella upcycled into a bike bag!  Fabulous idea and complete with lights from Green Issues by Agy

And finally a bit of a different upcycle - jewellery made from spoons!  I love this - it is so creative and funky!
This comes from Callaloux Bikoux and you can buy these lovely things on facebook so pop across and say hi!


Well I hope you have enjoyed my little wander around some fellow bloggers work - I certainly have.  Do pop across to their blogs and shops and give them a follow or a like.  I think this post represents what I love so much about upcycling really well - reduce waste and be super creative and innovative while your at it!
 I hope you feel inspired - till next time! :)
x


Sunday 26 January 2014

Tunic top

This week after a little review of my wardrobe I decided it was time to invest some time making some clothes for me.  I have this fantastic floral fabric I bought from a charity shop and have already used some of it to make a bag.  It is really 60's so I decided to go with a light - easy - breezy tunic.  Tunics are so simple to make and I love them.  They look great, they are comfortable to wear and if your using bright fabric they can really make a statement.

I didn't have a pattern so I used another top to get the sizing right.

I drew round this top adding some extra fabric to create a shoulder and also allowing about 1.5cm for a seam allowance.  I also flattened the neck line out at the back.
These were the pieces I had for the top part.  One for the front and two for the back.  Really simple to shape as I just relied on the outline of my last top.


I cut out sleeves from another pattern I had (I have never been great at doing my own sleeves - something to work on) and then set to work.  Using an overlocker to bind the seams I sewed shoulder to shoulder together and then the side seams before adding the sleeves.  I added a small gather to each sleeve which works really well but I actually added it in because I didn't quite measure out right and ended up with sleeves a bit bigger than the arm hole.  The finished effect I am pleased with though.  
I then used bias binding the edge the top.

I curved the back to create a neat edging and then finished the bias binding about half way down before closing the seam up.


Then I cut two more pieces the same size as each other.  I decided on my length, added 1.5cm for seam allowance and then took my top measurement and multiplied it by 1.5.
I gathered the two pieces so the width now matched the width of the top, sewed the side seams and then overlocked the top piece and bottom piece together.

Then I just added some bias binding to divide the top a little bit and a cute button to finish the top.

I closed off my seams and I was done - here you have it.


I wore it out today and felt really comfortable in it - I plan to make a few more tunics in the next few weeks.  While making this one I found a fab old pattern that used to belong to my Mum which is for some great tunics with sailor tops and some fabulous flares so I might get onto them!
Watch this space for how I continue to funk up my wardrobe!  This new tunic probably cost me £1.50 as I still have half the fabric left and it cost me £3 to buy.  What a bargain plus the pleasure of making it included in that price!
Do share the things you make for yourself in the next few weeks!
x